We feel bad for (and empathise fully with) those who are intolerant to milk and other dairy products. It’s not possible to put your finger on why, but for some reason it always seems like …..-free alternatives to cakes that are usually …..-rich never taste as good, nor are they ever presented as beautifully.
You may not know this about us, but here at Crystal Clear Cake Stands, we like to think of ourselves as a collection of like-minded mavericks, which is why we decided to cast aside our doubts and strived for what seems like eternity to find a dairy-free cake recipe that is exceedingly delicious and looks just as amazing.
We don’t mind telling you that this quest was quite arduous and at times we felt like our resolve was going to wane and crack under the pressure. But finally, through perseverance and sheer force of will, we prevailed.
This is the recipe we found. Try it and you shall not be disappointed.
Ingredients
- 340g of granulated brown sugar (12oz)
- 340g of dairy-free margarine (12oz)
- 340g of gluten-free* self raising flour (12oz)
- 6 medium sized eggs
- 60ml of soya milk
- 55g of cocoa powder (2oz)
- Chocolate butter-cream icing
* The ‘gluten-free’ part is optionalOther than the ingredients you will want to prepare a trio of 8 inch (20cm) round cake tins with a base line of grease, pre-heat your oven to 180°C, and have 2 piping bags at the ready.
Now to get started!
- Place the margarine, flour, eggs and sugar into your mixer and whisk them until they have blended together and become light and fluffy.
- Add the soy milk into the mix and beat it again until they have all mixed together.
- Split the mixture in half and, into one of them, add the cocoa powder.
- Pour a third of your two mixtures into separate piping bags, preferably with the same sized nozzles, or none at all.
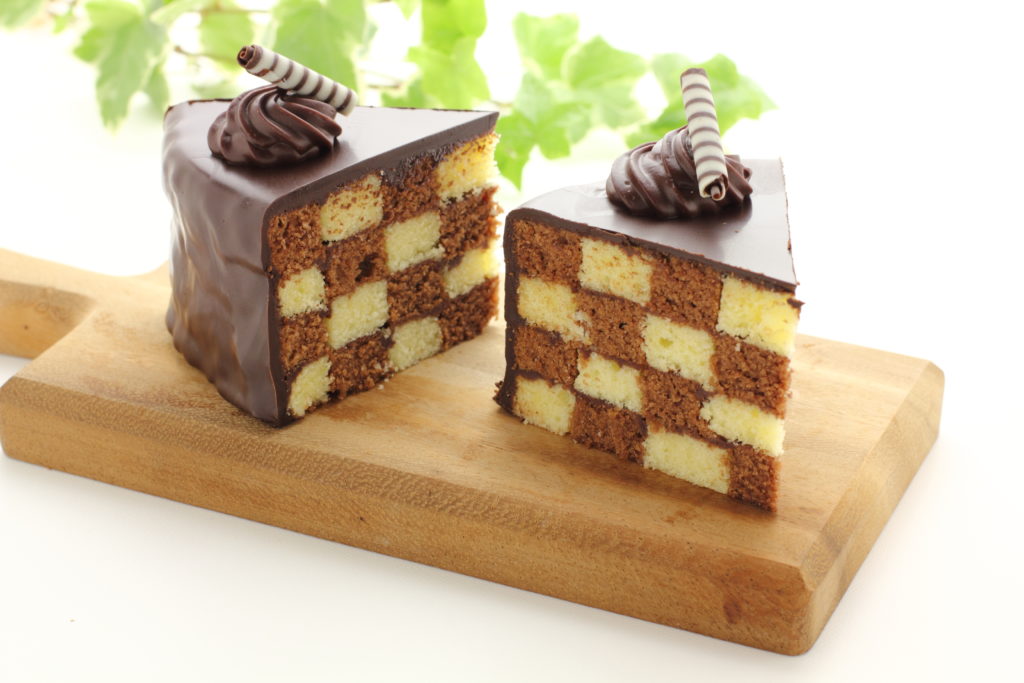
- Pipe half of either bag around the outside of one of your cake tins, and work your way inwards, alternating the mixtures, until it looks like an archery target (you may manage to get 2 circular layers of both).
- Repeat steps 4 & 5 with your other 2 tins, but inside one of the tins reverse the colours; so if you had the chocolate mix on the outside the first time around, have the chocolate-free mix on the outside second time around.
- Now that you have your 3 tins filled with your spirally mixtures, it is time to put them in your (pre-heated at 180°C) oven for approximately 20 minutes.
- After the 20 minutes has elapsed remove the 3 tins and leave them to cool down.
- Once cool, it is time to put your layers together, using the chocolate butter-cream icing as the concrete that holds the layers together. Please ensure that the layers of which you have two of are on the bottom and the top, otherwise the chequer-board effect will not be apparent.
- Finally, a small act of subterfuge! Cover the whole cake in chocolate butter-cream icing and throw on some decorations, to give the impression that the cake is little more than an ordinary, run-of-the-mill chocolate cake.
It is a bit of a sneaky trick, but it is always fun to see the surprised reaction to it when the cake is first cut into. We hope you find this cake as enjoyable to make and gobble up as we did. Not to sound immodest or anything but when we tried it out the results were so yummy that people were startled to discover that it was devoid of dairy or gluten.
Safe to say we proved those aforementioned naysayers wrong!